Overview
Front End
For The front end of chatvious I used a both React and Ejs. Only the main page and the about page are rendered with react. The other pages are all rendered with ejs in lambda functions and send the client the html. The reason I choose react for the main and about pages are because they didn’t need anything that needs to be fetched from a database. The reason I choose ejs for the rest of the pages was not just because I needed to fetch stuff from a database but also I wanted to try to use server side rendering for html.
After building it, It didn’t seem to bad but one thing I did notice was how much cold starts affected page loads. This was a noticable difference and I know this wouldn’t be as bad if it were hosting this on a long running server, or justed used react to show a loading status before showing what needs to be shown.
I used Webpack to bundle the front end. This was my first project using webpack and it’s seems pretty overwhelming but I do like the extensibilatiy it offer compared to other bundlers.
Back End
For The backend, I used a lot of AWS Resouces. The reason for this was because I wanted to learn more about serverless technologies because that seemed important to know if I wanted to get into web development. While making this project, I did learn a lot about serverless technologies and web development in general. This Project was originally going to be just a nodejs project with the express framework and some serverless technologies, but then I just transistioned to a more serverless approach.
I also used a tool called AWS Sam. This is an Infrastructure as code (IaC) tool that help me in a few different ways. It can build and package lambda functions, Locally test Lambda functions, Run an api gateway rest api locally, and build and deploy my IaC Sam templates. Sam uses CloudFormation Under the hood so when it builds the Sam templates, it turns them into CloudFormation templates and deployes that. It also Abstracts some resouce defintions on the template like lambda functions and api gateway but I still had to write many of the resouces in the same way as someone would with CloudFormation. If you would like to check it out, here is a link to the documentation. AWS Sam Documentation
I also have Github Actions Github Actions set up for this project so code can be tested and deployed automatically.
The following section shows the aws resouces used.
The backend compute which is mainly invoked and ran by Api Gateway. They all use nodejs runtimes.
The app utilizes a REST Api Gateway to handle HTTP requests from the client.
The app utilizes a Websocket Api Gateway to handle Websocket requests from the client for real time communication.
DynamoDB is used as the Database for Chatvious.
The app utilizes Amazon CloudFront To serve the Static Content that was made for this chatvious. Cloudfront also caches to static content reducing request to the s3 bucket.
The app utilizes an Aws S3 bucket to store all the static content which CloudFront uses.
Other
The app also uses other resouces like Route 53 for the domain and Amazon Certificate Manager for the tls certificates used by the aws services.
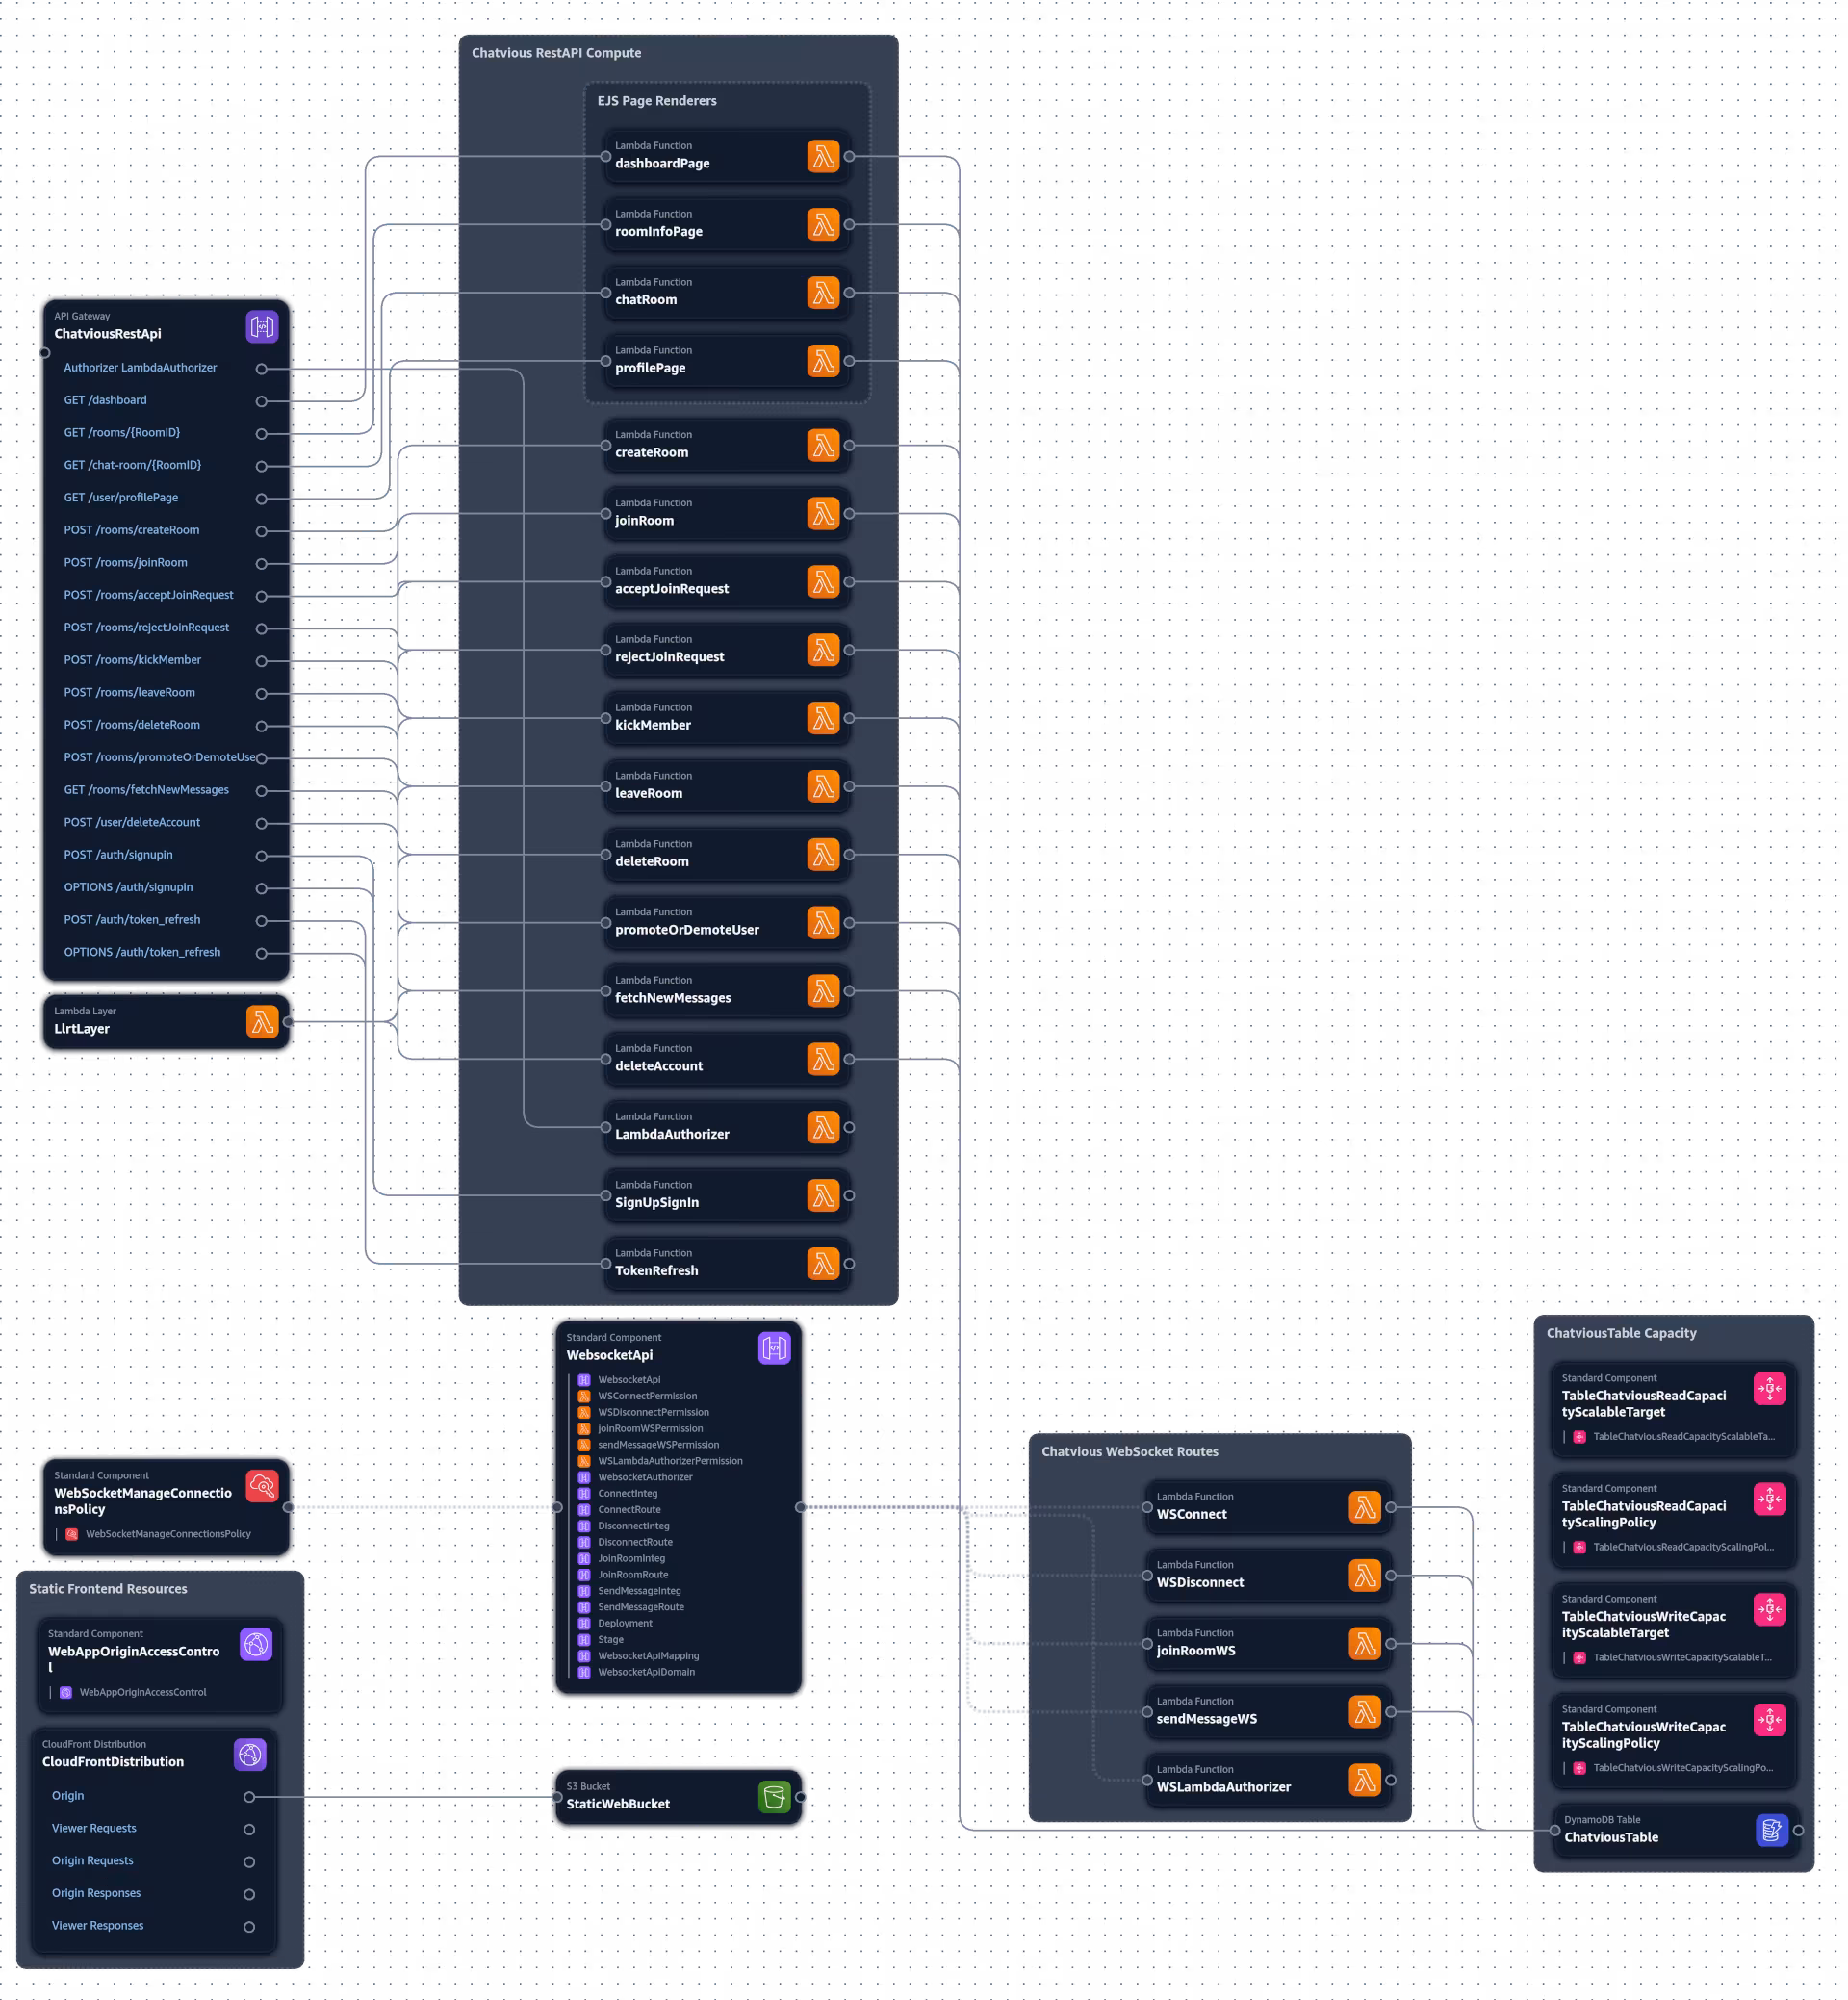
I also made an image so you can see how chatvious works visually. I made this Image with a tool called Application Composer. It’s a tool that helps a bit for design Aws Sam templates or CloudFormation Templates and they had an option to export an image.
Image of chatvious Infrastructure
Chatvious Pages
Chatvious requires that you log in in order to use it and some of you may not want to do that. This section can help with that by explaining the pages and showing pictures so you don’t have to log in to see how it works if you don’t want to.
Dashboard Page
The first Page you see when you log in is the dashboard page. This page shows you all the rooms you are in and own. For each Room, there is a button to see more info about the room and to join the actual chat room. both of those redirect you to a new page. you can also create a new room here and join a new room here. to join a room, you will have to get the room id which the owner can provide to you.
The following sections shows a screenshot of the dashboard page.

Room Info Page
If you clicked on the button to see the rooms info or input the rooms url, you will show up in the room info page. You don’t have to be in the room to see the room info page but you will see different things based on the type of user you are to the room. Here you can get information about the page and if you are an owner or admin you can manage the room here.
The following section shows 2 screenshot of the room info page. One as owner and one as a member
As an Owner

As a Member

Profile Info Page
If you click on your icon in the navbar on the top right corner near the logout button you can see an option to go to your profile info page to see your account info. Also if anyone sends a join request to a room you are the admin or owner of, they will also show up here saying you have a join request in that room. The profile page has information about your account and it’s also the place where you can delete your account if you would like to.
The following section shows a screenshot of the profile info page.

Chat Room Page
This is the Chat Room Page. Here you can chat with anyone who is in the room. I made it so that you can only send a maxium of 2000 characters. When a user sends a message, their circle profile image, username, and status will show as well.
The following section shows a screenshot of the chat room page.
